DashCubbies

Console tops & dash panels

A console top that actually fits your helm.

Cup holders where your hand falls. A recess deep enough to hold gear through a wake. Printed in plastic that takes sun and salt, and screwed down so it stays put.

Our stock console top $129.62 380 × 168 × 86 mm · PETG · quoted from the file, not estimated
Exactprice from the real file
No boltssections slide together
UV-stablePETG & ABS
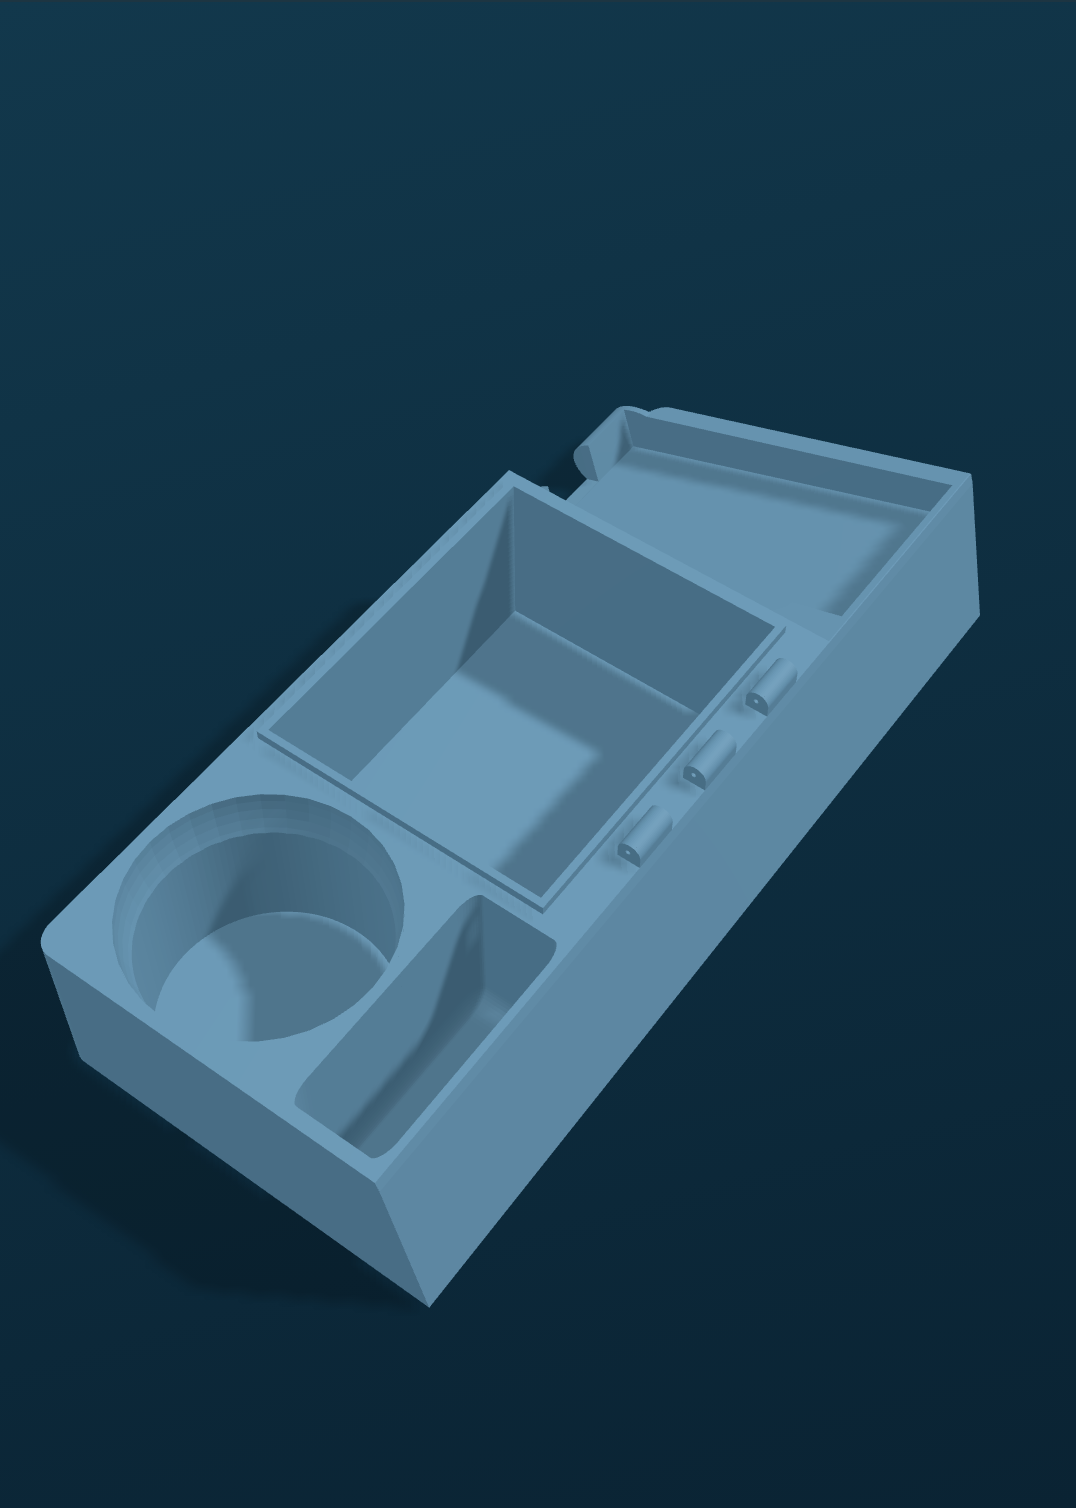
The stock DashCubbies console top: a flat-topped panel with a deep centre recess, a round cup holder and a slot pocket.

The panel

Everything on it is there for a reason.

This is a part we already make, so these are not round numbers off a drawing — they are measured off the file that goes to the printer.

128 × 155 centre recess

72 mm deep, floored, not a hole. Phones, wallets and a handheld stay in it when you come off a wave.

100 mm cup holder

Tapers to 92 mm at the floor, so a can or a bottle wedges instead of rattling. 72 mm deep.

38 × 100 slot pocket

Sunglasses, pliers, a knife — standing up where you can grab them, not sliding round the deck.

Solid base, right across

4 mm underneath the whole panel. It is what stops the top racking when you lean on it, and what gives every pocket a floor.

Raked outboard side

13° lean with an 18 mm flange round the base, so it sits down on the console and screws through from above.

Ramped end

The last 108 mm falls away from 55 mm to 10 mm, so the panel finishes into the console instead of stopping dead.

See it in 3D and order Different size? Design your own

How it’s made

Three sections, no bolts.

A panel this size is longer than any printer bed, so it comes in sections. Most people join those with bolts and inserts — things that corrode, back out, and get dropped in the bilge.

Ours slide together on dovetail keys printed into the part. The key is wider at its tip than at its root, so the joint cannot be pulled apart sideways. It goes together one way only, and the further you slide it the tighter it sits. A bead of adhesive in the socket makes it permanent if you want it that way.

The seams are placed in solid material between the openings — never through a cup holder or a recess.

6 mm 4 mm neck 10 mm head one section the next

Materials

Two of these belong on an open boat.

Printed FDM, solid-walled, layers running the strong way for the part. Tell us where it’s going and we’ll tell you which to pick.

FilamentSun & UVSoftens nearBest forCost
PETGstart hereVery good80 °CAny open helm. Tough, slightly flexible, does not go brittle.$$
ABSGood95 °CEnclosed helms and dark colours that really bake.$$
PETG-CFExcellent85 °CLong panels that must not flex. Matte charcoal, very stiff.$$$$
PLAPoor55 °CCabin only. It will sag on a console in July.$
PLA MattePoor55 °CLow-glare faces out of direct sun. Same limits as PLA.$$

Pricing

Printer time, plastic, one setup fee.

A panel costs what it costs to make: the hours it sits on the machine at $5 an hour, the filament it eats, and a flat $15 to set the job up. That is the whole formula, and you see it broken out line by line before you send anything.

More than one? The setup fee is charged once, and runs of 2, 5 and 10 take 5%, 10% and 15% off the printing.

Our stock console top

  • Printer time — 16 h 07 m @ $5.00/hr$80.58
  • PETG — 770 g$27.04
  • 2 dovetail seams — test-fit and dressed$7.00
  • Setup, once per order$15.00
  • Total$129.62

Exact, because this part already exists — the numbers come from the file itself. A panel you design is an estimate until we check it.

Design your own

Different console? Build the panel for it.

Set the length, depth and height, rake the outboard side to match your console, then drop in cup holders, slot pockets, trays, gauge holes and cut-outs wherever you want them. The price updates as you go.

1

Measure the console

Length, depth, and how high you want the top to sit. Millimetres or inches.

2

Place your openings

Add what you need and slide each one along the panel until it looks right.

3

Watch the warnings

It tells you when two openings are too close, when one runs off the edge, and where the sections will divide.

4

Send it over

We check it prints cleanly, confirm the price and a lead time by email, then make it.

Open the designer

Questions

The things people ask first.

What does “exact price” mean?
For a panel we already make, the shape in the designer is not a drawing of the part — it is the part. The page loads the same file that goes to the printer, measures its volume and surface area, and works the price out from those. Nothing is rounded or guessed. A panel you design yourself is an estimate, because it does not exist yet; we check it and confirm before anything is made.
How do the sections hold together with no bolts?
Sliding dovetails, printed as part of the panel. Each seam carries two or more keys — 6 mm deep with a 4 mm neck opening out to a 10 mm head — and the sockets are cut 0.2 mm larger so they slide rather than fight. Because the key is wider at its tip than at its root, the joint cannot be pulled apart sideways. Nothing to corrode, nothing to back out, nothing to drop in the bilge.
Will it hold up in salt and sun?
PETG and ABS both handle salt, spray and UV well. The thing to design around is heat, not water — a dark panel on a closed console in July can reach 60–70 °C, which is why PLA is a cabin-only material here. Light colours run cooler. Tell us where it’s going and we’ll steer you.
Is 3D printed plastic strong enough for a helm?
For a console top, yes. PETG with a 4 mm top and a solid base underneath is stiffer than most moulded panels you can buy, and it does not go brittle in UV the way cheap PLA does. What we would not print is something structural that carries a person or an engine load. Panels, trays, brackets and holders are well inside what the material handles.
Can you copy the panel I already have?
Usually. Measure the outside, the height you want it to sit at, and where each cutout goes, and the designer gets you most of the way there. If your console has a curve, a moulded step, or has to clear something underneath, send the design through with a photo and a note — we do custom modelling by the hour and quote the extra time before starting.
How long does it take?
The stock panel is about 16 hours on the machine, so with cleanup and shipping it is usually a few days. The designer tells you the machine hours for anything custom. Big multi-section builds and multi-colour prints take longer, and we always give you a real lead time in the reply before you pay anything.
Go measure your console.

Three numbers is all it takes to see your panel in 3D and know what it costs.

Open the designer